Posts

Showing posts from 2014

Create a MySQL Database, Username, Password, and Privileges from the command line

Step 1: Login to MySQL ( you will need an account ) user@server:~$ mysql -u mysql_user -p Enter password: Step 2: Create the Database mysql > create database db_name; Step 3: Verify that it’s there mysql > show databases; Step 4: Create the User mysql > create user db_user; Step 5: Grant privileges while assigning the password mysql > grant all on db_name.* to 'db_user'@'localhost' identified by 'db_password'; *Note: The localhost field usually doesn’t have to be edited, but you can set it to the specific address. The above example grants all privileges, obviously. But you will likely want to limit privileges under many circumstances. These parameters include select, insert, and delete. Choose all that apply and separate by comma, thusly: mysql > grant select, insert, delete on db_name.* to 'db_user'@'localhost' identified by 'db_password';

How to install Softaculous in WHM

Image
1) In order to install Softaculous ensure ionCube Loaders are enabled. If it is not enabled you can go to WHM >> Tweak Settings >>PHP >> Select ioncube from Loader to use for internal cPanel PHP 2) Now Login to the server as root. 3)Go to the directory /usr/local/cpanel/whostmgr/docroot/cgi cd /usr/local/cpanel/whostmgr/docroot/cgi 4) Download Softaculous wget -N http://www.softaculous.com/ins/addon_softaculous.php 5) Change the permissions to 755 chmod 755 addon_softaculous.php That’s for the command line. Now login to WHM 6) Go to WHM > Plugins> Softaculous – Instant Installs

How to change email password through webmail

Image
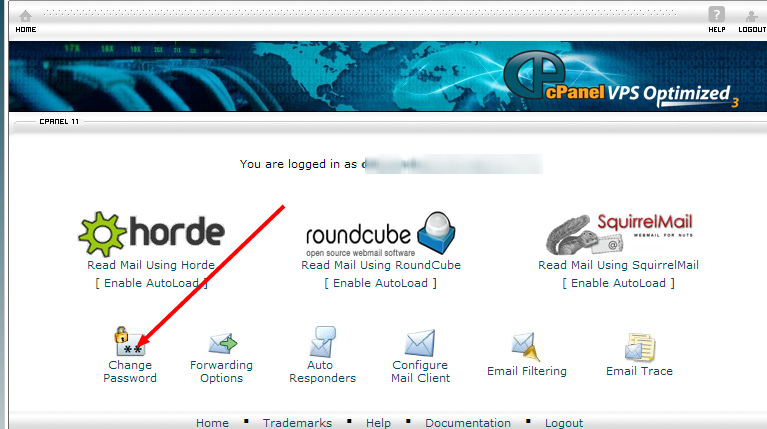
1.Login to your webmail account (Example: http://www.domain.com/webmail) 2.From the webmail home, click on the Change Password icon.  3.Now enter your new password in the provided field and click on change button. If you have configured your e-mail account in Outlook Express, MS Outlook or any other e-mail client, and configured it to remember the password, then you will have to change it to the new password.

SQL Server Creating an instance of the COM

SQL Server : Creating an instance of the COM component with CLSID: Problem with creating maintenance plans While working on a project to configure backup job , I had problem with creating maintenance plans in SQL 2008 R2, x64 as when tried to open maintenance plans got below mentioned error message . Second, it might happen that one can open the maintenance plans wizard, but at the time of submission, same error appears so same can be solved with below mentioned workaround. Error Message: ======================================================================== Maintenance Plan Wizard Progress - Creating maintenance plan "Daily backup (Error) Messages • Create maintenance plan failed. ------------------------------ ADDITIONAL INFORMATION: Creating an instance of the COM component with CLSID {17BCA6E8-A95D-497E-B2F9-AF6AA475916F} from the IClassFactory failed due to the following error: c001f011. (Microsoft.SqlServer.ManagedDTS) ------------------------------ Cre

How To White List IP In Configserver Firewall In WHM

Image
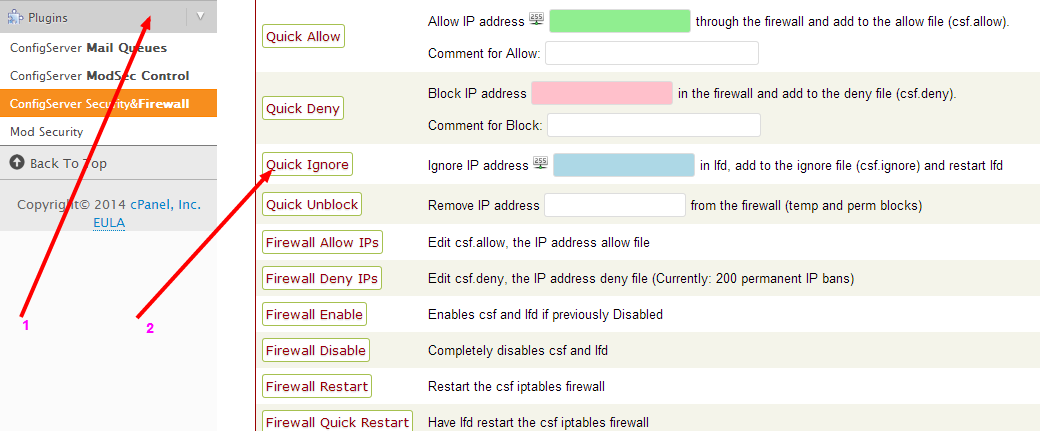
We can white list an IP address in Configserver from WHM using the steps mentioned below: [1] Login to WHM [2] Now, click on “ConfigServer Security&Firewall” option under the “Plugins” . [3] Now, enter the IP which you wish to white list in front of text box of “Remove Deny” option and click on “Remove Deny” option. From WHM > ConfigServer Security&Firewall > look for “Edit lfd ignore file” select csf.ignore – IP Blocking on dropdown list and click Edit button Info for csf.ignore file is all IP addresses listed will be ignored by all lfd checks. Since it will be ignored so it won’t be blocked (automatically white listed)

File and folder Permissions

Permissions are set using a command called CHMOD. CHMOD stands for CHange MODe. You are giving the host computer new instructions about this file or directory. CHMOD comes as a set of 3 numbers. Each of these 3 numbers is a sum total of 3 other numbers. So you have to add 3 numbers to get the first CHMOD number, add 3 numbers to get the second CHMOD number and add 3 numbers to get the third CHMOD number. Understanding the numbers... Each digit is a number value from 0 to 7. The value specifies what capabilities are available (or not). These numbers correspond to 3 command types. Read, write and execute. Read (r) has a value of 4. It allows listing files in the directory. Write (w) has a value of 2. It allows the addition of new files to the directory. Execute (x) has a value of 1. It allows access to the files in the directory. Here are the possible combinations available using these command types : Digit rwx Result 0 --- no access

How create an email account in Outlook Express

1>    Start Outlook Express. Click on Tools in the menu bar and then go to Accounts. 2>    this brings up the Internet Accounts pop-up window. Click on the Mail tab, to bring it to the front if it is not already so. If you are starting Outlook Express for the first time, there would not be any email accounts listed on this window. 3> To add a new mail account, click on the Add button and then on Mail as shown in the image below. 4> This brings up the Internet Connection Wizard pop-up window. Enter your name in the Display Name field and click on the Next button. 5> The wizard now asks for your email address. Enter the full email address and click on the Next button. 6>  In the next window, you need to feed in three important bits of information –       Incoming email server is POP 3.       Incoming email server : yourdomain.com       Outgoing email server: yourdomain.com 7> The last information that you need to enter to complete the setup of the

How to set iptables rules in centos

The rules we used for firewall 2 were: Stop all incoming traffic using the following command: iptables -P INPUT DROP Allow SSH session to firewall 2 by using the following command: iptables -A INPUT -p tcp --dport 22 -s 0/0 -j ACCEPT Allow ICMP traffic to firewall 2 by using the following command: iptables -A INPUT -p icmp -j ACCEPT Allow all related and established traffic for firewall 2 by using the following command: iptables -A INPUT -m state --state RELATED,ESTABLISHED -j ACCEPT Stop all forwarding by using the following command: iptables -P FORWARD DROP Allow forwarding of TCP traffic on IP interface 172.110.60.0 (client) port 80 (HTTP) and port 443 (HTTPS) to go to 192.168.40.95 (webApp.secure) by using the following commands: iptables -A FORWARD -p tcp --dport 80 -s 172.110.60.0 /24 -d 192.168.40.95 -j ACCEPT iptables -A FORWARD -p tcp --dport 443 -s 172.110.60.0 /24 -d 192.168.40.95 -j ACCEPT Allow forwarding of ICMP traffic by using t

Proxmox qm set ID –lock backup failed: exit code 25

Proxmox qm set ID –lock backup failed: exit code 25 #vm locked after failed backup, can't unlock qm set $SYSTEM_ID$ --lock backup failed: exit code 25 Seems the VM is looked bay another "vzdump" already running? If not, simply unlock it: qm unlock $SYSTEM_ID$

Installing Oracle VM Server and Manager

Oracle may not be the biggest virtualization player, but its enterprise virtualization product, Oracle VM, is simple to install if you have all the right components.

How to get PHP scripts working in HTML files

You can't run PHP in .html files because the server does not recognize that as a valid PHP extension unless you tell it to. To do this First, create a blank text file and name it ".htaccess" file in your root web directory and add this line to it: AddType application/x-httpd-php .htm .html This will tell Apache to process files with an .htm or .html file extension as PHP files.Next, open the file with a simple text editor like the "vi Editor" and Paste the following line into the file AddType application/x-httpd-php .html .htm If this does not work, please remove the line above from your file and paste this alternative line into it, for PHP5: AddType application/x-httpd-php5 .html .htm Now Create a file named hellotest.html and put it in your web server's root directory (DOCUMENT_ROOT) with the following content: Example #1 our first PHP script: hellotest.html <html>  <head>   <title>PHP Test</title>  </he

cPanel or WHM Accounting Logs:

Location :  /var/cpanel/accounting.log Description : Contains a list of accounting functions performed through WHM, including account removal and creation.. cPanel error logs: Location :  /usr/local/cpanel/logs/error_log Description : cPanel logs any error it incurs here. This should be checked when you encounter errors or strange behavior in cPanel/WHM... Client Information, Requested URL Logs: Location :  /usr/local/cpanel/logs/access_log Description : General information related to access cPanel requests is logged here. Bandwidth Logs: Location :  /var/cpanel/bandwidth Description : Files contain a list of the bandwidth history for each account. Each named after their respective user. Apache Access Logs: Location :  /usr/local/apache/logs/access_log Description : Complete web server access log records all requests processed by the server. Message Reception and Delivery: Location :  /var/log/exim_mainlog or /var/log/exim/mainlog Description : Recei

How to reduce SYN flooding using sysctl.conf

Linux has a nice file for setting up kernel value at boot time. This file can be found in   /etc/sysctl.conf   If you open and edit, you will find many values you can transform to improve security on your server. I think the most important value you can set to secure your TCP connection is:   net.ipv4.tcp_syncookies=1   Another thing you can do is reduce the timeout value from 60 to 30 seconds, this is not TCP standard at all to do that, but at least, the connection refresh will be faster than default. Note: keep in mind this reduces impact of SYN flooding, it will not stop them completely. Make sure you don’t set this value too low over wise it could create TCP loss packet situation.   net.netfilter.nf_conntrack_tcp_timeout_syn_recv=30 Last thing you can make is to create Iptables entry to limit them on your server. # create new chains iptables -N syn-flood # limits incoming packets iptables -A syn-flood -m limit --limit 10/second --limit-burst 50 -j RETURN # log attacks iptables -A

How to detect SYN attack

How to detect SYN attack? During a SYN attack, the attacker is opening lots of connections to you server but never completes the TCP connection establishment process. The state of each connection will stay SYN_RECV. This is how to count such connections: # netstat -anutp | grep SYN_RECV | wc -l If the number is >30, it is likely that you are under a SYN attack. However, I do not recommend to use netstat in automated scripts to monitor traffic. When you are under a real SYN attack, it may run too long and drain lots of CPU resources. 2) You can monitor live bandwidth of the attack using vnstat: # vnstat -l -i eth0 It is a very useful tool that will definitely help you understand how powerful the attack is. 3) I also recommend you to install an advanced analogue of top called htop and also monitor how the attack affects your CPU resources. Launch htop: # htop Press F2, go to 'Display options' and choose 'Display threads in a different color'. You will see system inte

How to Redirect page without browser address changing

Redirect page without changing the domain name in browser http://en.wikipedia.org/wiki/URL_redirection Preserve domain name after redirect all client requests on host A to host B. Create index.html page in documnet root of hostA Frame redirects <frameset rows="100%">   <frame src="http://www.example.com/"> </frameset> <noframes>   <body>Please follow <a href="http://www.example.com/">link</a>!</body> </noframes> Rewrite/Redirect Rule . http://tomclegg.net/rewriterule http://httpd.apache.org/docs/1.3/misc/rewriteguide.html www.example.com : hostB

How to add swap space in centos

Add system swap space for virtual memory paging: Swap space may be a swap partition, a swap file or a combination of the two. One should size swap space to be at least twice the size of the computer's RAM. (but less than 2GB)    dd if=/dev/zero of=/swapfile bs=1024 count=265032  - Create file filled with zeros of size 256Mb    mkswap /swapfile          - Create swap file    swapon /swapfile          - Begin use of given swap file. Assign a priority with the "-p" flag.    swapon -s                 - List swap files    cat /proc/swaps           - Same as above     This example refers to a swap file. One may also use a swap partition. Make entry to /etc/fstab to permanently use swap file or partition. /swapfile               swap                    swap    defaults        0 0     Note: To remove the use of swap space, use the command swapoff. If using a swap partition, the partition must be unmounted.

How to find word in Linux

●     Search and list all files from current directory and down for the string ABC: find ./ -name "*" -exec grep -H ABC {} \; find ./ -type f -print | xargs grep -H "ABC" /dev/null egrep -r ABC * ●     Find all files of a given type from current directory on down: find ./ -name "*.conf" –print ●     Find all user files larger than 5Mb: find /home -size +5000000c -print ●     Find all files owned by a user (defined by user id number. see /etc/passwd) on the system: (could take a very long time) find / -user 501 -print ●     Find all files created or updated in the last five minutes: (Great for finding effects of make install) find / -cmin -5 ●     Find all users in group 20 and change them to group 102: (execute as root) find / -group 20 -exec chown :102 {} \; ●     Find all suid and setgid  executable : find / \( -perm -4000 -o -perm -2000 \) -type f -exec ls -ldb {} \; find / -type f -perm +6

Useful Commands in Linux and centos

Image
/home full issue(creating disk space) find /home/*/ -name .trash | xargs rm -rf ================== changing permission for file only find . -type f -exec chmod 644 {} \; for directory find . -type d -exec chmod 775 {} \;  find /home/*/public_html -iname '*.mp3' -exec mv "{}" /home/delete \;  find /home/*/public_html -iname 'backup-' -exec mv "{}" /home/delete \; ================== How  know the hard drive speed ( this will check how fast the sites are resoving also) Use /dev/hda or /dev/sda or what ever is the drive in the server: hdparm -tT /dev/hda This command will show results like: /dev/hda: Timing cached reads:   8808 MB in  2.00 seconds = 4406.87 MB/sec Timing buffered disk reads:  162 MB in  3.03 seconds =  53.44 MB/sec If the second measurement is under 40MB/sec, the server is too slow and needs a hardware checkup Monitoring the system: Basic command line: pstree Processes a